Kanga or khanga.
We all know kanga cloth. It is a piece of cloth with lots of uses. It is
colorful and always goes well with any other color. These kanga cloths are
beautiful.
Today we are going to use kanga
cloth to make a simple backpack that
can be used by children, young people, adults and even our older people. Why
not?
These backpacks can be made
by almost anyone with some basic sewing skills. These backpacks can be sold in
the market or in shops. They are very easy to make and do not use a lot of
material.
First, we cut a rectangle of kanga cloth with about
80cm by 30cm. When cutting this rectangle we can follow the design on the cloth
or not. This piece of cloth will be for the body of the backpack.
Now we cut two small pieces of cloth. These can be of the
same cloth or of a different cloth, like some remnants from some other sewing job.
These pieces are about 12cm by 8cm and will be used to make the small loops on each side of the
backpack where the shoulder straps will be tied.
Finally we cut two pieces of
chord, or thin soft rope, with a
length of about 150cm each. These pieces of chord will be used to make the shoulder straps of our backpack.
That
is it. This is all we need. We can now start sewing all the pieces
together.
We will start with the small
loops. These are a bit narrower in
the middle and a bit wider at the two ends. This way the shoulder straps will
move easier and the loops will have more support from the stitches that fix
them to the backpack bag.
After sewing as shown by the
temporary white stitches we turn these loops
right side out leaving the hems on
the inside.
We fold the large piece of
cloth in a half and we fix these loops to the bottom edges of the bag, one on
each side of the bottom of the bag.

Now we can sew both edges of
the backpack bag all the way but not quite to the top. We need to leave some
space to form the hems at the top of
the backpack. These
hems will receive the shoulder strap chords.
Once finished, these hems
should look like this:
And the bag of the backpack
is finished!
We turn the bag inside out
and thread the chords for the shoulder straps.
Like in the picture, these
chords for the shoulder straps should be threaded
one on each side.
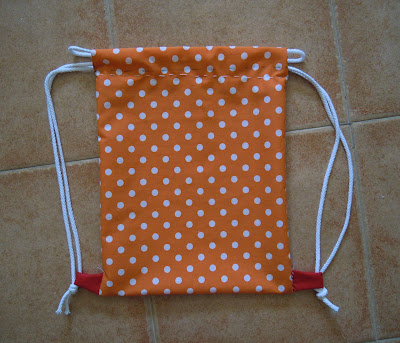
The end result is like this:
The shoulder straps should
be tied to the loops with a simple knot. That way we can remove them to be
washed or replaced, and when we want to wash the backpack. It is much easier to
wash, dry and press, if you are so inclined, the backpack without the shoulder
straps.
In the end we have our kanga backpack. It is ready!
Came out pretty nice, didn’t
it?
Now go and make your own.
You can make them for
yourself, to give away to friends as presents, or to sell them!
I wish I had some kanga
cloth. The model would have come out much nicer!


No comments:
Post a Comment